
Learn how to build a **DIY garden tool organizer for your shed** with this complete guide. We share expert tips and proven methods to reclaim your floor space and maximize vertical storage.
Discover the best materials, layout strategies, and mounting techniques for a durable, functional system. Whether you have a small corner or a full wall, these actionable steps will transform your cluttered shed into an organized, efficient workspace. Let’s get started.
Best Garden Tool Organizers for Shed Storage – Detailed Comparison
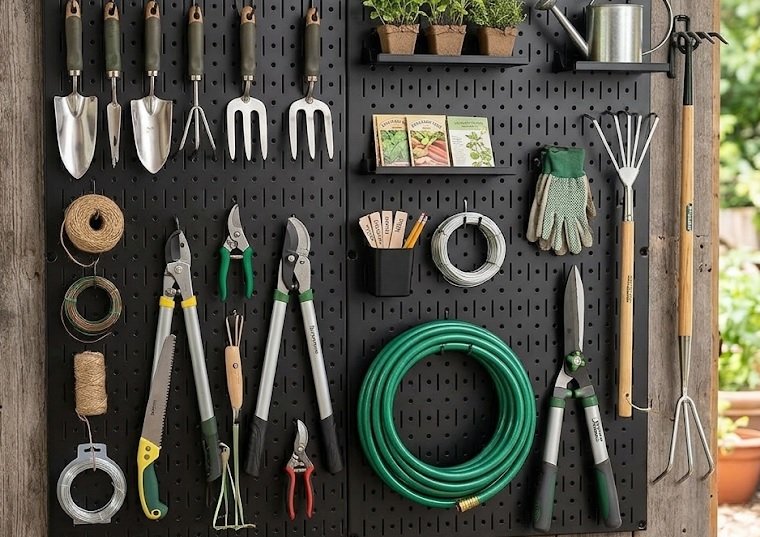
Wall Control 16-Peg Steel Organizer – Best Overall Choice
The Wall Control 16-Peg Steel Organizer (model WB-16) offers exceptional durability with its powder-coated steel construction. This **heavy-duty organizer supports up to 80 pounds**, making it ideal for shovels, rakes, and hoes. The 16 adjustable pegs let you customize spacing for different tool handle diameters. It is the **best option** for sheds with limited wall space needing maximum versatility.
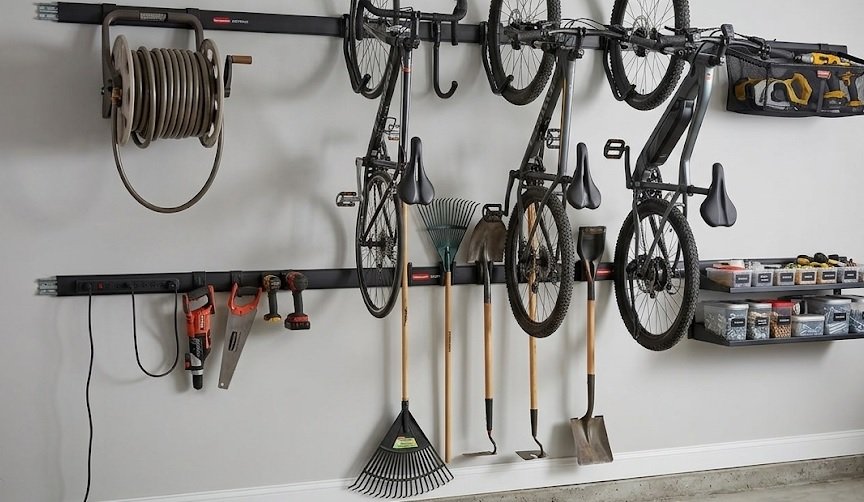
Rubbermaid FastTrack Garage Rail System – Best for Modular Flexibility
The Rubbermaid FastTrack Garage Rail System (model FG3P0300) provides a sleek, rail-based solution that mounts in minutes. Its sliding hooks allow for quick repositioning without removing the rail from your wall. **This system excels at storing long-handled tools**, extension cords, and small accessories simultaneously. It is **recommended** for DIYers who anticipate changing their storage layout frequently.
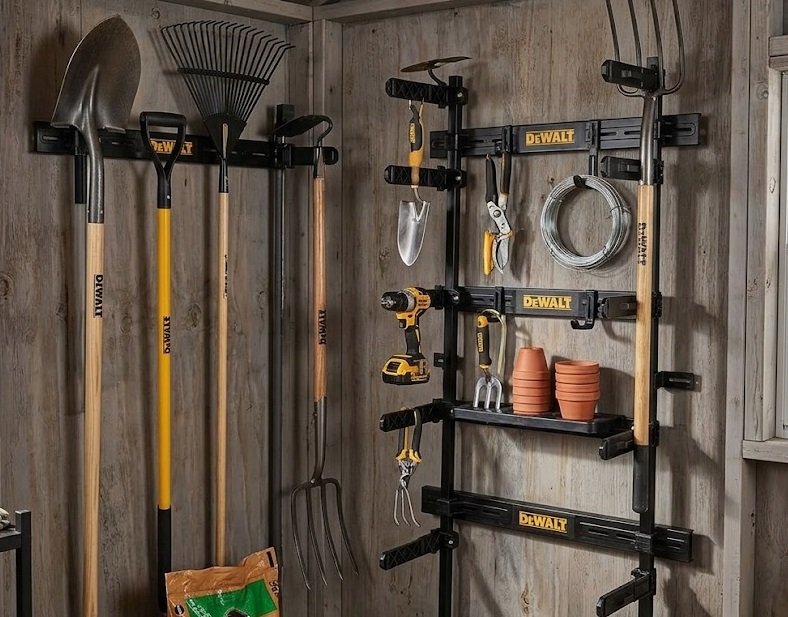
DeWalt 36-Inch Steel Tool Organizer – Best for Heavy-Duty Use
The DeWalt 36-Inch Steel Tool Organizer (model DWST08050) features a robust, welded steel frame with pre-drilled mounting holes. It includes **six oversized hooks and a built-in shelf**, perfect for heavier equipment like post-hole diggers and hedge trimmers. This unit is **ideal for** professional landscapers or homeowners with extensive collections who need a permanent, rigid storage solution.
Planning Your DIY Garden Tool Organizer Layout for Maximum Efficiency
Before you purchase materials or pick up a drill, you must assess your shed’s available wall space and your specific tool collection. A thoughtful layout prevents wasted space and ensures every tool has a dedicated home. Start by grouping your tools into categories: long-handled, hand tools, and power equipment.
Measuring Your Shed Wall Space Correctly
Use a tape measure to record the width and height of each available wall section. **Focus on walls without windows or existing shelving** to maximize usable area. Mark any wall studs with painter’s tape, as these are the only secure anchor points for heavy loads.
- Stud spacing: Standard spacing is 16 inches on center, but verify with a stud finder.
- Clearance depth: Allow at least 12 inches of depth for tool handles to hang freely.
- Traffic flow: Keep the pathway to your shed door unobstructed for easy access.
Choosing the Right Wall Configuration
For narrow sheds, a **single vertical rail system** works best for storing long-handled tools like rakes and shovels. Wider sheds benefit from a horizontal grid pattern using pegboards or slatwall panels. Consider a hybrid approach: dedicate one wall to heavy tools and another to smaller hand tools.
Weight Distribution and Accessibility
Place heavier tools like post-hole diggers at waist height to reduce strain when lifting. Store frequently used items like pruners and trowels at eye level for instant access. Reserve the highest and lowest zones for seasonal tools you rarely use, such as snow shovels in summer.
Step-by-Step Guide to Building Your DIY Garden Tool Organizer
Now that your layout is planned, it is time to gather materials and start building. This straightforward process uses basic tools and requires only a few hours of your time. Follow these proven steps to construct a sturdy organizer that will last for years.
Gathering Materials and Tools
You will need a drill with a screwdriver bit, a level, a stud finder, and a measuring tape. For the organizer itself, purchase **2×4 lumber for the frame, pegboard or slatwall panels, and heavy-duty hooks**. Do not forget galvanized screws rated for exterior use to prevent rust in the damp shed environment.
- Cut the lumber: Measure and cut your frame pieces to fit your planned wall section.
- Locate wall studs: Use your stud finder and mark each stud location clearly.
- Attach the frame: Screw the 2×4 frame securely into the wall studs.
- Mount the panel: Fasten your pegboard or slatwall to the frame using appropriate screws.
- Install hooks: Place hooks according to your layout plan, spacing them for tool handles.
Installing the Wall Mounting System
For maximum stability, always anchor your organizer into wall studs rather than drywall alone. Use a level to ensure your frame is perfectly straight before tightening all screws. This prevents tools from sliding off and keeps your organizer looking professional.
Securing Hooks and Accessories
Different tools require different hook styles for a secure fit. Use **double-prong hooks for long-handled tools** like rakes and shovels, and smaller single hooks for hand tools. For items like hoses and cords, install specialized U-shaped holders that keep coils neatly wrapped.
Creative Space-Saving Solutions for Small Sheds and Garages
Not every shed has the luxury of expansive wall space, but that does not mean you cannot achieve a highly organized system. Creative vertical and overhead solutions can double your storage capacity without sacrificing floor area. These strategies work especially well for compact sheds and narrow garage corners.
Utilizing Overhead Ceiling Storage
Your shed’s ceiling is often an overlooked goldmine for storage. Install **heavy-duty ceiling hooks or a pulley system** to suspend bulky items like ladders, wheelbarrows, and folding chairs. This frees up valuable wall space for your DIY garden tool organizer while keeping large equipment out of the way.
- Ceiling hooks: Ideal for hanging bicycles and long-handled tools vertically.
- Pulley platforms: Perfect for storing seasonal items like patio cushions.
- Rafter shelves: Great for lightweight bins filled with gloves and small accessories.
Maximizing Door Space for Tool Storage
The inside of your shed door provides a surprisingly useful mounting surface. Attach a slim over-the-door organizer or a small pegboard panel to store hand tools, spray bottles, and gloves. **This keeps frequently used items within arm’s reach** without taking up any wall or floor space.
Building a Rolling Tool Cart for Flexibility
For ultimate versatility, consider building a **rolling tool cart with vertical pipe holders** for long-handled tools. This mobile solution lets you move your tools to the garden bed where you are working. Add casters rated for outdoor use to ensure smooth movement over uneven ground.
Maintenance Tips to Extend the Life of Your Garden Tool Organizer
Building your organizer is only half the battle; proper maintenance ensures it remains functional and safe for years. Regular upkeep prevents rust, sagging, and premature wear on both the structure and your tools. A few minutes of preventive care will save you from costly repairs or replacements later.
Routine Inspections and Tightening
At the start of each season, inspect all screws, brackets, and hooks for signs of loosening or corrosion. **Tighten any hardware that has worked itself free** due to daily use and temperature fluctuations. Pay special attention to anchor points in the wall studs, as these bear the heaviest loads.
- Monthly check: Wiggle hooks and rails to confirm they are secure.
- Seasonal check: Apply a rust-inhibiting spray to any bare metal surfaces.
- Annual check: Replace any bent or damaged hooks immediately.
Cleaning and Protecting Wood Components
Wooden frames are susceptible to moisture damage in a shed environment. Wipe down your organizer with a dry cloth periodically to remove dust and debris. **Apply a fresh coat of exterior-grade sealant or paint** every two years to protect the lumber from humidity and pests.
Organizing and Rotating Tools Seasonally
Your storage needs change with the seasons, so rotate tools based on current gardening tasks. Store summer tools like trimmers at the front during growing season, and move snow equipment forward in winter. **This practice prevents overcrowding** and reduces the risk of tools falling and causing injury.
Common Mistakes to Avoid When Building a DIY Garden Tool Organizer
Even experienced DIYers make errors that compromise the functionality and safety of their storage systems. Recognizing these pitfalls before you start will save you time, money, and frustration. Here are the most frequent mistakes and how to sidestep them entirely.
Ignoring Wall Stud Locations
Mounting your organizer directly into drywall without hitting a stud is the most critical error you can make. Drywall alone cannot support the weight of heavy garden tools, leading to catastrophic failure. **Always use a stud finder** and secure your frame into at least two wall studs for proper load distribution.
- The result: Organizer pulls out of the wall, damaging tools and drywall.
- The fix: Use heavy-duty toggle bolts only for lightweight items.
Overloading Hooks and Shelves
Every hook and shelf has a maximum weight rating, and exceeding it invites disaster. Check manufacturer specifications before hanging heavy equipment like tillers or concrete tools. **Distribute weight evenly across multiple hooks** rather than concentrating it on a single point.
Poor Spacing Between Hooks
Cramming hooks too close together makes it difficult to remove and replace tools without tangling. Leave at least **2 to 3 inches of clearance between long-handled tools** and 4 inches for wider items like shovels. This simple spacing consideration keeps your organizer functional and frustration-free.
Forgetting to Label Storage Zones
Without clear labels, you will inevitably forget where specific tools belong, leading to clutter over time. Use a label maker or chalkboard paint to mark each section clearly. **This small step helps maintain organization** long after the initial build excitement fades.
Budget-Friendly Alternatives for Building Your Garden Tool Organizer
You do not need a large budget to create an efficient and attractive garden tool organizer. With some creativity and repurposed materials, you can build a highly functional storage system for a fraction of the cost. These budget-friendly alternatives prove that smart planning beats expensive store-bought solutions.
Repurposing PVC Pipes for Tool Storage
Standard PVC pipes make excellent, low-cost holders for long-handled tools. Cut 6-inch sections of 4-inch diameter PVC pipe and mount them vertically to a wooden board. **This simple solution keeps handles upright and prevents them from falling over** in corners.
- Cost: Less than $15 for a 10-foot pipe.
- Durability: PVC resists moisture and will not rust.
- Customization: Paint or wrap pipes to match your shed decor.
Using Pallet Wood for a Rustic Organizer
Free pallets can be disassembled to create a sturdy, rustic wall organizer with minimal tools. Sand the wood smooth, attach pallet slats horizontally to a frame, and use the gaps to hold tools. **This approach costs almost nothing** and adds a charming farmhouse aesthetic to your shed.
Converting Old Cabinets into Tool Storage
An unused kitchen cabinet or bookshelf can transform into a fantastic enclosed tool organizer. Mount the cabinet to your shed wall and install pegboard inside the doors or on the back panel. **This creates hidden storage** that keeps your tools dust-free and out of sight.
Building with Scrap Lumber and Repurposed Hooks
Visit local construction sites or recycling centers for free scrap lumber and old hardware. Clean up old hooks, brackets, and nails to create a unique, character-filled organizer. **This sustainable approach saves money** while reducing waste and giving your shed a one-of-a-kind look.
Safety Considerations for Your DIY Garden Tool Organizer
Safety should always be your top priority when designing and building a garden tool storage system. Sharp blades, heavy equipment, and unstable mounting can create serious hazards in your shed. Implementing a few key safety measures protects you, your family, and your tools.
Proper Storage for Sharp and Pointy Tools
Tools like pruners, shears, and saws require special attention to prevent accidental cuts. Store these items in **sheathed holders or enclosed containers** rather than open hooks. Always position sharp edges facing downward or toward the wall, never toward the walking path.
- Blade guards: Use rubber caps or leather sheaths on all cutting tools.
- High placement: Keep sharp tools out of reach of children.
- Lockable cabinet: Consider a locked storage box for hazardous tools.
Securing Heavy Equipment to Prevent Tip-Overs
Heavy items like wheelbarrows, tillers, and gas cans can cause serious injury if they fall. **Anchor tall equipment to the wall with straps or brackets** to prevent accidental tip-overs. Store chemical containers on low, sturdy shelves with spill containment trays.
Ensuring Adequate Lighting and Clear Walkways
Poor lighting and cluttered floors significantly increase the risk of accidents in your shed. Install bright LED lighting near your organizer to clearly see where each tool belongs. **Keep the floor clear of stray tools and cords** to prevent trips and falls.
Child-Proofing Your Storage System
If children have access to your shed, implement additional safety measures. Place all dangerous tools on high hooks or in lockable cabinets that are inaccessible to little hands. **Install a latch or lock on the shed door** to prevent unsupervised entry and ensure your DIY garden tool organizer does not become a hazard.
Conclusion: Build Your Perfect DIY Garden Tool Organizer Today
Building a **DIY garden tool organizer for your shed** transforms cluttered chaos into an efficient, safe workspace. You now have the complete blueprint, from planning and materials to maintenance and safety considerations.
Start small, measure carefully, and choose the storage style that fits your unique needs. **Your tools deserve a proper home**, and your shed will finally feel spacious and inviting.
Take the first step today and reclaim your space with confidence.
Frequently Asked Questions about DIY Garden Tool Organizers
What is the best way to organize garden tools in a shed?
The best way involves using vertical wall space with a combination of pegboards, slatwall panels, or a custom-built rail system. This keeps tools off the floor and makes them easily visible and accessible. Prioritize grouping tools by type and frequency of use.
For most sheds, a hybrid approach works best. Install a pegboard for hand tools, use heavy-duty hooks for long-handled implements, and add overhead racks for bulky seasonal equipment. This multi-layered strategy maximizes every square foot of space.
How much weight can a DIY garden tool organizer hold?
A properly constructed organizer anchored into wall studs can safely hold between 100 and 200 pounds. The exact capacity depends on your materials, fastener quality, and the number of studs used. Always use galvanized screws and heavy-duty hooks rated for your heaviest tools.
Distribute weight evenly across the organizer rather than concentrating it in one area. If you need to store extremely heavy equipment like tillers, reinforce the frame with additional lumber or use dedicated floor-standing racks instead.
What is the ideal height to hang long-handled garden tools?
The ideal height for hanging long-handled tools like rakes and shovels is between waist and shoulder level. This positioning allows for easy grip and removal without excessive bending or stretching. For most adults, this translates to roughly 36 to 48 inches from the floor.
Consider the length of your longest tool when determining clearance. Leave at least 12 inches of space above the floor to accommodate the tool’s bottom end. This prevents handles from dragging on the ground and keeps your organizer within comfortable reach.
Should I use pegboard or slatwall for my garden tool organizer?
Pegboard is more budget-friendly and offers flexible hook placement across its entire surface. However, it is less durable and can sag under heavy loads unless backed with plywood. Slatwall is stronger, more attractive, and allows for easy repositioning of accessories.
For heavy garden tools, slatwall is generally the better option due to its superior weight capacity. If you prefer pegboard, choose a thick 1/4-inch or 3/8-inch version and reinforce it with a wooden frame to prevent bending.
How do I prevent my garden tools from rusting on the organizer?
Prevent rust by cleaning and drying tools thoroughly before storing them on your organizer. Apply a light coat of oil to metal surfaces, especially before long-term storage. Ensure your shed has adequate ventilation to reduce humidity levels.
Adding silica gel packs or a small dehumidifier to your shed can dramatically reduce moisture. Consider mounting your organizer away from exterior walls that may experience condensation. This proactive approach extends the life of both your tools and your storage system.
What is the most common mistake when building a DIY tool organizer?
The most common mistake is failing to anchor the organizer securely into wall studs. Mounting directly into drywall will eventually cause the entire system to pull away from the wall. This can damage your tools and create a serious safety hazard.
Always use a stud finder to locate solid anchor points before drilling. If studs are not available in your desired location, use heavy-duty toggle bolts rated for the weight you plan to store. Proper anchoring is the foundation of any safe and functional organizer.
Can I build a garden tool organizer without power tools?
Yes, you can build a simple organizer using basic hand tools like a hammer, screwdriver, and hand saw. Use pre-drilled pegboard panels and screw-in hooks that require minimal assembly. A hand-powered drill or screwdriver will work for most mounting tasks.
For easier installation, consider using adhesive mounting strips for lightweight items only. However, for heavy tools, manual screwdrivers and sturdy screws into wall studs are still necessary. This approach takes more time but is entirely feasible for any DIY enthusiast.
How often should I reorganize my garden tool storage?
Perform a light reorganization at the start of each gardening season to align tools with upcoming tasks. A more thorough reorganization should be done annually, ideally in late winter. This is the perfect time to clean, sharpen, and assess which tools you actually use.
Adjust your organizer layout based on seasonal needs, moving frequently used tools to prime positions. This routine keeps your system efficient and prevents clutter from accumulating. Regular maintenance ensures your DIY garden tool organizer remains a valuable asset for years.