
For a raised garden bed to thrive, you must place it in a location receiving at least 6-8 hours of direct full sunlight daily. This strategic positioning is the single most critical factor for maximizing vegetable yields and vibrant flower blooms.
This complete guide reveals proven methods for assessing your yard’s light patterns and avoiding common shade traps. We’ll share expert tips on orientation and spacing to ensure your garden flourishes, so read on to master the perfect placement.
Best Raised Garden Bed Kits for Full Sun Locations
Choosing the right raised garden bed kit ensures your sunny spot translates into thriving plants. We’ve selected top-rated options that excel in durability, drainage, and heat retention—perfect for maximizing those precious daylight hours.
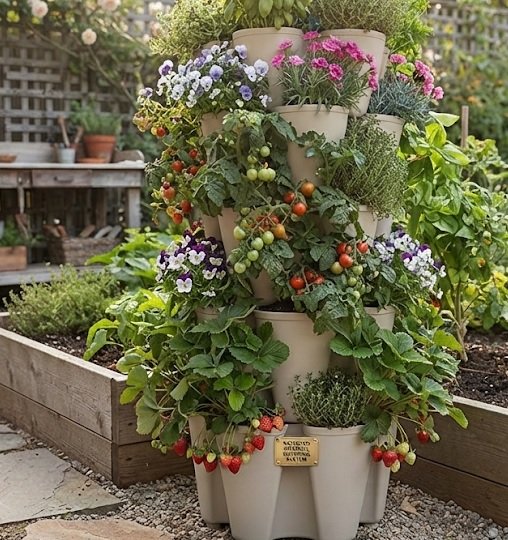
GreenStalk 5-Tier Vertical Planter – Best for Small Spaces
The GreenStalk 5-Tier Vertical Planter is the best option for patios or balconies with intense sun exposure. Its vertical design captures sunlight from multiple angles while the built-in watering system reduces evaporation. Ideal for growing strawberries, herbs, and salad greens in compact, full-sun areas.
Vego Garden 17″ Tall Metal Raised Garden Bed – Best Overall Choice
The Vego Garden 17″ Tall Metal Bed (Model VG100-48) is our recommended choice for open, sunny yards. Its food-grade steel construction absorbs heat to warm soil faster in spring, promoting earlier growth. The deep 17-inch height provides excellent root space and minimizes soil drying, making it ideal for tomatoes and peppers.
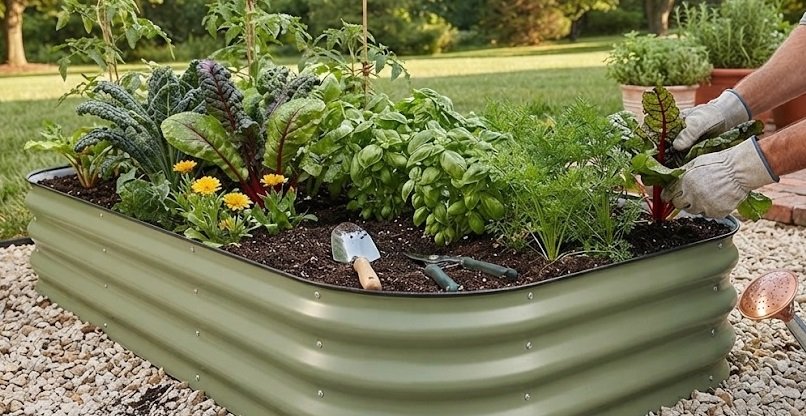
Birdies 8-in-1 Raised Garden Bed – Best for Durability
The Birdies 8-in-1 Raised Garden Bed (Model 650L) features corrosion-resistant zinc-aluminum steel that handles harsh UV rays without fading. Its modular design allows you to create custom shapes to fit your sunny landscape perfectly. This is the best option for gardeners seeking a long-term, heavy-duty investment that won’t overheat roots.
How to Measure Sunlight Patterns in Your Yard
Before committing to a location, you must observe how sunlight moves across your property. This simple assessment prevents costly mistakes and ensures your raised garden bed receives the optimal light exposure it needs.
The 24-Hour Observation Method
Choose a sunny day and monitor your potential garden spots at three key times: 9:00 AM, 12:00 PM, and 4:00 PM. Mark areas that receive continuous, uninterrupted sunlight during all three checks.
- Morning sun (6-10 AM): Gentle light ideal for cool-season crops like lettuce
- Midday sun (10 AM-2 PM): Intense light essential for fruiting plants like tomatoes
- Afternoon sun (2-6 PM): Hottest rays that benefit heat-loving peppers and eggplant
Common Shade Traps to Avoid
Many gardeners unknowingly place beds near structures that cast deceptive shadows. Fences, trees, and building corners can block sunlight for several hours daily, even if the spot looks bright at noon.
Key Takeaway: A spot receiving 6+ hours of direct sun is suitable for most vegetables. Aim for 8+ hours if you plan to grow sun-loving crops like cucumbers, squash, or melons.
Using Sun-Mapping Apps and Tools
For precise measurements, download a sunlight tracker app like SunSeeker or Lumos. These tools use your phone’s compass and GPS to map daily sun exposure, giving you a visual heat map of your yard. Alternatively, a simple sun calculator costs under $20 and provides accurate light readings.
Once you identify the sunniest spot, consider the bed’s orientation. Align the longest side facing south to capture maximum sunlight throughout the day. This north-south orientation ensures even light distribution across all plants.
Best Placement Strategies for Different Garden Types
Your specific gardening goals determine the ideal raised bed location. Whether you’re growing vegetables, herbs, or ornamental flowers, each plant type has unique sunlight requirements that influence placement decisions.
Vegetable Gardens: Prioritize Maximum Sun Exposure
Most edible crops demand full sun (8+ hours) to produce abundant harvests. Position vegetable beds away from tall structures and deciduous trees that might cast afternoon shadows during the growing season.
- Leafy greens: Tolerate 4-6 hours but prefer morning sun to prevent bolting
- Root vegetables: Need 6 hours of direct light for proper bulb development
- Fruiting crops: Require 8+ hours for optimal flower pollination and fruit set
Herb Gardens: Balancing Sun and Heat Protection
Mediterranean herbs like rosemary, thyme, and sage thrive in intense afternoon sun. However, delicate herbs such as cilantro and parsley appreciate some afternoon shade in hot climates. Place these beds on the east side of structures to receive morning light with afternoon relief.
Ornamental and Flower Beds: Matching Light Preferences
Flowering plants vary widely in their sun needs. Sun-loving annuals like marigolds and zinnias need 6-8 hours, while shade-tolerant perennials like hostas prefer filtered light. Group plants with similar light requirements together to simplify placement decisions.
| Garden Type | Minimum Sun Hours | Ideal Placement |
|---|---|---|
| Vegetables | 8+ hours | Open yard, south-facing |
| Herbs | 6-8 hours | East or west side |
| Flowers | 4-8 hours | Varies by species |
Pro Tip: In southern climates with intense heat, consider afternoon shade for cool-season crops. A location with full morning sun and partial afternoon shade often produces better results than all-day exposure.
Transitioning to placement, remember that wind exposure also affects plant health. Avoid placing beds in open, windy corridors that dry soil quickly and stress plants. A sheltered sunny spot near a south-facing wall provides both light and protection.
Orientation and Spacing: Maximizing Sunlight Efficiency
Once you’ve selected the sunniest location, proper bed orientation and spacing become critical. These factors determine whether every plant receives adequate light or if taller specimens cast unwanted shadows on shorter neighbors.
North-South vs. East-West Orientation
For rectangular raised beds, north-south orientation is generally recommended. This alignment ensures sunlight strikes both sides of the bed evenly throughout the day, preventing one side from dominating light exposure.
- North-south: Even light distribution, ideal for mixed plantings
- East-west: Maximizes southern exposure, best for tall crops on the north end
- Diagonal placement: Captures morning and afternoon sun effectively
Spacing Between Multiple Beds
If you’re installing several raised garden beds, proper spacing prevents shadow interference. Leave at least 3-4 feet of walkway between beds to allow sunlight to reach lower portions of plants and ensure easy access for maintenance.
Consider the mature height of your plants when positioning multiple beds. Place tall crops like corn or pole beans on the north side of shorter plants to prevent them from blocking sunlight to lower-growing vegetables.
Reflective Surfaces and Microclimates
Strategic use of reflective surfaces can amplify available sunlight. White gravel, light-colored walls, or reflective mulches bounce additional light onto plants, increasing photosynthesis and warming the soil earlier in spring.
Key Takeaway: A south-facing wall creates a beneficial microclimate by absorbing heat during the day and releasing it at night. This extends your growing season by 2-4 weeks in cooler climates.
Remember that tree roots and overhead branches compete with your garden for water and nutrients. Maintain at least 10 feet of clearance from large trees to avoid root invasion and ensure unobstructed sunlight reaches your raised beds throughout the entire growing season.
Common Sunlight Mistakes and How to Fix Them
Even experienced gardeners make placement errors that compromise plant health. Recognizing these common pitfalls helps you avoid costly corrections and ensures your raised garden bed thrives from day one.
Mistake #1: Ignoring Seasonal Sun Shifts
The sun’s angle changes dramatically between summer and winter. A spot that receives full sun in June may become heavily shaded by September as the sun drops lower in the sky.
- Summer solstice: Sun rises further north, casting shorter shadows
- Winter solstice: Sun stays low, creating longer shadows from structures
- Solution: Observe your yard during both spring and fall before finalizing placement
Mistake #2: Overlooking Reflected Heat
Placing beds against south-facing walls can cause excessive heat buildup in summer. While this microclimate benefits early spring growth, it may stress plants during peak summer temperatures.
To mitigate this, install shade cloth during July and August or choose heat-tolerant varieties. Alternatively, position beds 2-3 feet away from walls to allow air circulation while still capturing reflected warmth.
Mistake #3: Underestimating Tree Canopy Growth
New homeowners often place gardens near young trees that seem harmless. Within five years, those saplings can cast substantial shade over your carefully positioned raised beds.
Pro Tip: Before planting, research the mature canopy spread of nearby trees. A tree with a 30-foot spread will eventually shade a 15-foot radius, potentially covering your entire garden.
If you discover shade issues after installation, consider these fixes: prune lower branches to raise the canopy, relocate beds to sunnier spots, or switch to shade-tolerant crops. Acting early prevents stunted growth and disappointing harvests.
Seasonal Adjustments for Optimal Sunlight Capture
Your raised garden bed’s sunlight exposure changes throughout the year. Implementing seasonal adjustments ensures your plants receive adequate light during every growth phase, from early spring seedlings to late fall harvests.
Spring: Maximize Early Warmth
In early spring, soil temperatures lag behind air temperatures. Position beds to capture maximum southern exposure to warm soil faster and extend your growing season significantly.
- Use cold frames: These transparent covers trap heat and protect seedlings
- Install row covers: Floating fabric adds 5-10°F of soil warmth
- Choose south-facing slopes: Natural terrain amplifies sun exposure
Summer: Manage Intense Heat
During peak summer, excessive sunlight can stress plants and accelerate soil moisture loss. Implement strategic shading techniques to protect sensitive crops while maintaining adequate light for fruiting varieties.
Install 40-60% shade cloth during the hottest afternoon hours (2-5 PM) for cool-season crops. Alternatively, plant tall companion crops like sunflowers or okra on the western edge to cast natural afternoon shade on heat-sensitive plants.
Fall: Extend the Harvest Window
As daylight hours decrease, maximize remaining sunlight by removing spent plants that block light to younger crops. Clean trellises and prune overhanging branches to prevent premature shading.
Key Takeaway: Reflective mulches like red plastic or aluminum foil can increase light intensity by up to 20%, boosting photosynthesis during shorter fall days and improving yields significantly.
Consider installing portable cold frames or hoop houses in fall to trap both sunlight and heat. These structures extend your growing season by 4-6 weeks, allowing you to harvest fresh vegetables well into late autumn.
Tools and Techniques for Monitoring Sunlight Exposure
Accurate sunlight monitoring transforms guesswork into data-driven decisions. Using the right tools helps you verify your raised garden bed placement and make informed adjustments as seasons change.
Sunlight Meters and Sensors
A digital sunlight meter measures light intensity in foot-candles or lux, providing precise readings at different times of day. These handheld devices cost between $20-$50 and offer immediate feedback for placement decisions.
- Dr. Meter LX1330B: Measures up to 200,000 lux with high accuracy
- General Tools DLM100: Budget-friendly option with data hold function
- Smart sensors: Connect to smartphone apps for continuous tracking
Smartphone Apps for Light Tracking
Modern apps use your phone’s camera and GPS to map sunlight patterns across your yard. SunSeeker and Lumos provide augmented reality overlays showing sun paths throughout the year.
These apps allow you to simulate seasonal changes and predict future shade patterns. This forward-thinking approach prevents costly repositioning mistakes down the road.
DIY Shadow Casting Method
For a low-tech approach, use stakes and string to mark shadow boundaries at different times. Place a stake at the garden’s proposed location and trace the shadow’s edge every two hours from sunrise to sunset.
Pro Tip: Perform this test during both spring equinox and summer solstice. Comparing results reveals how much sunlight your bed will receive across different growing periods.
Combine multiple monitoring methods for comprehensive data. Track sunlight for at least one full week, including overcast days, to understand average conditions rather than relying on a single sunny-day observation.
Special Considerations for Urban and Small-Space Gardens
Urban gardeners face unique challenges when positioning raised beds for full sunlight. Limited space, tall neighboring buildings, and shade from fences require creative solutions to maximize available light.
Rooftop and Balcony Gardens
Elevated gardens often receive superior sunlight compared to ground-level plots. However, rooftop heat buildup and wind exposure create additional considerations for plant health and soil moisture retention.
- Use light-colored containers: Reflect heat away from roots
- Install windbreaks: Protect plants from drying winds
- Elevate beds: Improve drainage and air circulation
Dealing with Building Shadows
Urban structures cast long shadows that shift throughout the day. South-facing walls provide the most reliable sunlight, while north-facing areas remain perpetually shaded.
If your yard receives partial shade, consider vertical gardening systems that angle plants toward available light. Wall-mounted planters and trellises capture sunlight from multiple directions, maximizing limited exposure.
Community Garden Plot Selection
When choosing a plot in a community garden, visit at different times to observe actual sunlight patterns. Prime plots face south and sit away from tall fences, trees, or storage sheds that create unwanted shade.
Key Takeaway: In urban environments, even 4-6 hours of direct sunlight can support productive container gardens. Focus on shade-tolerant crops like leafy greens, herbs, and root vegetables for partially shaded spaces.
Consider portable raised beds on casters for maximum flexibility. These mobile gardens allow you to chase sunlight throughout the day, repositioning to follow optimal light conditions as seasons change.
Conclusion: Mastering Raised Garden Bed Sunlight Placement
Positioning your raised garden bed for full sunlight is the foundation of a thriving garden. By observing light patterns, choosing the right orientation, and adapting seasonally, you maximize yields and plant health.
Start with a simple 24-hour observation of your yard, then invest in quality tools like the Vego Garden or GreenStalk beds recommended above. Remember that even urban spaces can produce abundant harvests with strategic placement.
Your perfect sunny spot is waiting—observe, measure, and plant with confidence. Your future harvests will thank you.
Frequently Asked Questions about Raised Garden Bed Sunlight Placement
How many hours of sunlight do raised garden beds need?
Most vegetables require 6-8 hours of direct sunlight daily for healthy growth. Fruiting crops like tomatoes, peppers, and cucumbers need the full 8 hours, while leafy greens tolerate 4-6 hours.
For best results, observe your yard during the growing season. A spot receiving morning and early afternoon sun typically outperforms one with only late-day exposure, as morning light dries dew and reduces disease risk.
What is the best direction to face a raised garden bed?
Orient rectangular beds with the longest side facing south to maximize sunlight capture. This north-south alignment ensures even light distribution across all plants throughout the day.
If your yard has obstructions, position beds to avoid shadows from trees and buildings during peak sunlight hours. East-west orientation works well for tall crops planted on the north end.
Can raised garden beds get too much sun?
Yes, excessive heat from intense afternoon sun can stress plants and accelerate soil moisture evaporation. In southern climates, temperatures above 95°F may cause blossom drop in tomatoes and peppers.
Install 40-60% shade cloth during peak summer afternoons or plant heat-tolerant varieties. Deep mulching and consistent watering also help regulate soil temperature in full-sun locations.
How do I find the sunniest spot in my yard?
Use the 24-hour observation method by checking potential spots at 9 AM, noon, and 4 PM on a clear day. Mark areas receiving uninterrupted sunlight during all three checks.
Smartphone apps like SunSeeker provide augmented reality sun path overlays for precise measurements. Alternatively, use a sunlight meter to quantify light intensity at different locations.
Should I place my raised garden bed against a fence or wall?
South-facing walls create beneficial microclimates that absorb heat during the day and release it at night. This extends your growing season by 2-4 weeks in cooler climates.
However, maintain 2-3 feet of clearance to allow air circulation and prevent excessive heat buildup in summer. Avoid north-facing walls, which receive minimal direct sunlight and stay perpetually shaded.
What should I do if my garden bed is in too much shade?
First, prune nearby trees and shrubs to allow more light penetration. Remove lower branches to raise the canopy and reduce shadow coverage across your garden area.
If pruning isn’t sufficient, consider relocating the bed to a sunnier location or switching to shade-tolerant crops like lettuce, spinach, and herbs. Portable beds on casters offer flexibility to chase sunlight throughout the season.
How does morning sun versus afternoon sun affect plants?
Morning sun (6 AM-noon) provides gentle light that dries dew quickly, reducing fungal disease risk. This exposure is ideal for cool-season crops and delicate seedlings.
Afternoon sun (noon-6 PM) delivers intense heat that benefits warm-season crops like peppers and eggplant. However, this intensity can stress cool-season plants, making afternoon shade valuable in hot climates.
Can I use mirrors or reflective materials to increase sunlight?
Yes, reflective mulches and light-colored surfaces can increase light intensity by up to 20%. Red plastic mulch specifically enhances tomato and strawberry production by reflecting beneficial light wavelengths.
White gravel, aluminum foil, or light-colored walls bounce additional light onto plants. However, avoid concentrating reflected heat directly on foliage, as this can cause leaf scorching during peak summer.