
Wondering what is the difference between a tiller and a cultivator? The short answer is depth: tillers break new ground and dig deep, while cultivators are lighter tools for maintaining existing soil. Choosing the right machine saves you time, energy, and ensures healthier plant growth.
This complete guide breaks down their distinct functions, power sources, and best-use scenarios. We will share expert tips and proven methods to match the perfect tool to your specific gardening tasks. Keep reading to master your soil preparation strategy and avoid costly mistakes.
Best Garden Tools for Soil Preparation – Detailed Comparison
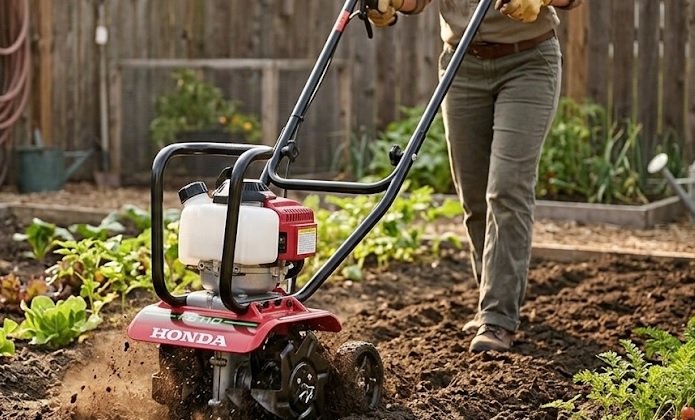
Honda FG110 Mini Cultivator – Best Overall Choice
The **Honda FG110** is the best option for gardeners seeking a lightweight yet powerful cultivator. Its 4-stroke engine eliminates the hassle of mixing fuel. This machine is ideal for tilling established beds, mixing compost, and weeding between rows with minimal effort.
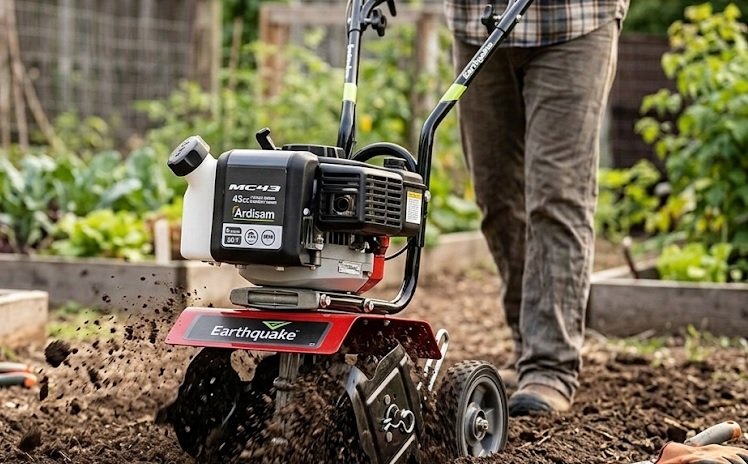
Earthquake MC43 Mini Cultivator – Best for Tough Soil
For heavy clay or compacted ground, the **Earthquake MC43** is highly recommended. It features forward-rotating tines that pull the machine forward, reducing operator fatigue. With a reliable 43cc Viper engine, this cultivator digs deeper than standard mini models. It is the best choice for breaking new ground in small plots.
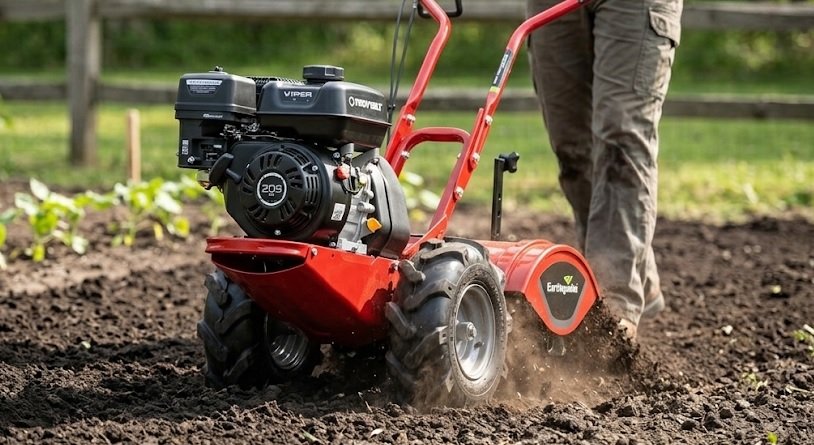
EARTHQUAKE Victory Rear Tine Tiller – Best for Large Areas
The EARTHQUAKE Victory Rear Tine Tiller is the perfect solution for expansive gardens. Its rear-tine design provides superior traction and digs up to 8 inches deep, making it ideal for sod-busting. The 208cc engine handles rocky soil with ease. For serious gardeners, this is the ultimate investment for annual bed preparation.
Understanding the Core Functional Differences
To truly grasp **what is the difference between a tiller and a cultivator**, you must look beyond marketing labels. The primary distinction lies in their mechanical design and intended soil depth. Tillers are heavy-duty machines built to break new ground, while cultivators are precision tools for ongoing maintenance.
Soil Depth and Working Capacity
Tillers feature larger, more aggressive tines that dig between **6 to 10 inches deep**. This depth is essential for turning over sod, incorporating heavy amendments, and aerating compacted subsoil. In contrast, cultivators typically work the top 2 to 4 inches of soil, which is perfect for uprooting young weeds without disturbing deeper root systems.
- Tillers: Break new ground, prepare seedbeds, and handle dense clay.
- Cultivators: Mix topsoil, aerate around plants, and manage light weed growth.
Power and Maneuverability
Weight significantly impacts usability. A standard tiller can weigh over **100 pounds**, requiring significant upper-body strength to control. Cultivators, however, often weigh less than 30 pounds, making them ideal for quick jobs in tight flower beds or raised garden boxes. You can easily maneuver a cultivator with one hand.
Time and Effort Efficiency
Using the wrong tool wastes energy. Attempting to dig deep furrows with a cultivator will strain the engine and frustrate you. Similarly, using a heavy tiller for simple weeding is overkill and risks damaging plant roots. Matching the tool to the task ensures faster completion and better soil structure.
Choosing the Right Tool for Your Garden Size and Soil Type
Selecting between these machines depends on your specific gardening conditions. Assessing your garden’s square footage and soil composition will guide you toward the correct purchase. Making the right choice prevents wasted money and physical strain.
Matching Equipment to Garden Dimensions
For gardens under **500 square feet**, a cultivator is usually sufficient. These compact spaces rarely require deep tilling once established. Larger plots exceeding 1,000 square feet demand the power and width of a full-size tiller to complete the job in a reasonable timeframe.
Soil Texture and Condition Analysis
Test your soil’s density before buying. Sandy or loamy soils are forgiving and respond well to cultivators. Heavy clay or rocky terrain requires the torque of a rear-tine tiller to break through compacted layers effectively.
| Soil Type | Recommended Tool | Reason |
|---|---|---|
| Sandy/Loamy | Cultivator | Easy penetration, low resistance |
| Clay/Compact | Tiller | High torque needed for depth |
| Established Beds | Cultivator | Protects root systems |
| New Sod/Grass | Tiller | Breaks thick root mats |
Physical Considerations and Storage Space
Your physical strength matters when operating these machines. Cultivators are ergonomically friendly for older gardeners or those with back issues. Additionally, tillers consume significant storage space in a garage or shed, while cultivators hang easily on a wall hook.
Ultimately, understanding **what is the difference between a tiller and a cultivator** helps you match the tool to the task. Prioritize your garden’s current needs and future plans when deciding.
Practical Usage Tips and Maintenance Best Practices
Owning the right tool is only half the battle. Proper operation and routine care extend the lifespan of your equipment significantly. These proven methods ensure optimal performance season after season.
Step-by-Step Guide for Safe Operation
Always inspect your work area for rocks, roots, and hidden debris before starting. Clear the space to prevent damage to the tines and protect yourself from flying objects. Follow these simple steps for effective tilling.
- Mark your boundaries: Use flags or spray paint to define the work zone.
- Start slow: Begin with shallow passes and gradually increase depth.
- Overlap rows: Overlap each pass by 2-3 inches for even coverage.
- Let the machine work: Avoid forcing the tines deeper than intended.
Seasonal Maintenance Checklist
Regular upkeep prevents costly repairs and breakdowns. A clean machine performs better and lasts longer. Implement this simple checklist after every use.
- Clean thoroughly: Remove caked soil and plant matter from tines and housing.
- Check fasteners: Tighten loose bolts and nuts that vibrate loose during operation.
- Inspect belts and cables: Look for fraying or wear on drive belts.
- Change oil regularly: Replace engine oil every 25 hours of use for gas models.
- Sharpen tines: Dull tines tear soil instead of cutting it cleanly.
Timing Your Soil Work for Best Results
Working soil when it is too wet causes clumping and compaction. Test moisture by squeezing a handful of soil; it should crumble easily. Spring and fall offer ideal conditions for most regions.
Understanding **what is the difference between a tiller and a cultivator** includes knowing when to use each. Cultivators excel at quick touch-ups during the growing season. Tillers shine during initial bed preparation and end-of-season cleanup.
Cost Analysis, Fuel Types, and Long-Term Value
Budget plays a decisive role in choosing between these garden tools. Prices vary dramatically based on power source and build quality. Understanding the total cost of ownership helps you make a financially sound decision.
Comparing Purchase Prices and Operating Costs
Cultivators generally cost between **$100 and $300**, making them accessible for casual gardeners. Tillers range from $400 to over $1,200 for professional-grade models. Fuel and maintenance expenses also differ significantly between the two categories.
| Cost Factor | Cultivator | Tiller |
|---|---|---|
| Initial Purchase | $100 – $300 | $400 – $1,200+ |
| Fuel Consumption | Minimal | Moderate to High |
| Annual Maintenance | $20 – $50 | $50 – $150 |
| Lifespan | 5-8 years | 10-15 years |
Electric vs. Gas vs. Cordless Options
Electric cultivators offer quiet operation and zero emissions, ideal for small urban gardens. Gas-powered tillers deliver unmatched power for large rural properties. Cordless battery models provide a middle ground with moderate runtime and convenience.
- Electric: Lightweight, low maintenance, requires extension cord.
- Gas: Maximum power, unlimited runtime, higher noise levels.
- Battery: Portable, quiet, limited to 30-60 minutes per charge.
Rental vs. Purchase Decision Framework
If you only need to break ground once, renting a tiller saves money. Rental costs average **$50-$80 per day** at local hardware stores. However, frequent gardeners benefit from owning a cultivator for year-round weed control.
Understanding **what is the difference between a tiller and a cultivator** extends beyond mechanics to financial planning. Choose a tool that fits your budget today and your gardening ambitions for tomorrow.
Common Mistakes to Avoid When Using Tilling Equipment
Even experienced gardeners make errors that damage their soil and equipment. Recognizing these pitfalls saves you time, money, and frustration. Learning from others’ mistakes is the fastest path to gardening success.
Working Soil at the Wrong Moisture Level
Tilling wet soil creates massive clods that harden like bricks when dry. This destroys soil structure and harms beneficial microorganisms. Conversely, tilling bone-dry soil creates excessive dust and strains the engine.
- Too wet: Soil sticks to tools and forms clumps.
- Too dry: Dust clouds form and tines bounce.
- Just right: Soil crumbles easily when squeezed.
Ignoring Underground Utilities and Obstacles
Hitting a buried cable or irrigation line causes expensive damage and safety hazards. Always call your local utility locator service before deep tilling. Mark sprinkler heads, tree roots, and shallow pipes clearly.
Using Incorrect Technique and Depth Settings
Plunging the tines too deep on the first pass strains the engine and creates uneven results. Gradually increase depth over multiple passes for smoother soil preparation. Additionally, moving too fast leaves skipped strips and inconsistent tilling.
Neglecting Safety Gear and Proper Attire
Flying debris can cause serious eye injuries without proper protection. Always wear safety glasses, sturdy boots, and long pants when operating either tool. Hearing protection is essential for gas-powered models that exceed 90 decibels.
Understanding **what is the difference between a tiller and a cultivator** includes knowing their limitations. Matching the tool to the task prevents unnecessary strain on both you and the machine. Avoiding these common errors ensures your equipment serves you for many seasons.
Environmental Impact and Soil Health Considerations
Your choice between a tiller and cultivator affects more than convenience—it impacts soil ecology. Over-tilling disrupts beneficial fungal networks and earthworm populations. Sustainable gardening practices prioritize minimal soil disturbance for long-term fertility.
The Science of Soil Structure Preservation
Frequent deep tilling breaks down soil aggregates, leading to compaction over time. This destruction reduces water infiltration and root penetration. Cultivators offer a gentler approach that preserves the delicate balance of soil organisms.
- Earthworms: Deep tilling slices through their tunnels.
- Mycorrhizae: Fungal networks take years to reestablish.
- Organic matter: Tilling accelerates decomposition of vital nutrients.
No-Till and Low-Till Gardening Methods
Modern gardeners increasingly adopt no-till methods to protect soil health. These approaches use cultivators for surface-level weed control without disturbing deeper layers. This practice sequesters carbon and reduces erosion significantly.
Noise Pollution and Neighborhood Considerations
Gas-powered tillers produce **90-100 decibels**, disturbing neighbors in suburban settings. Electric cultivators operate at a quieter 60-70 decibels, making them neighbor-friendly. Check local ordinances regarding noise restrictions for power equipment.
Sustainable Fuel Alternatives
Battery-powered models eliminate gasoline use entirely, reducing your carbon footprint. Solar-charged batteries offer an even greener option for eco-conscious gardeners. These modern tools provide sufficient power for most residential applications.
Understanding **what is the difference between a tiller and a cultivator** extends to environmental stewardship. Choosing the right tool protects your garden’s future productivity while minimizing ecological harm.
Specialized Gardening Scenarios and Tool Adaptations
Every garden presents unique challenges that require specific equipment strategies. Raised beds, greenhouses, and orchard rows each demand different approaches. Understanding these specialized scenarios helps you maximize your tool investment.
Raised Bed Gardening and Container Applications
Raised beds typically measure **4 feet wide or less**, making full-size tillers impractical. Compact cultivators fit perfectly within these confined spaces. Their lightweight design prevents damage to wooden or metal bed frames.
- Bed width: Cultivators handle narrow rows with ease.
- Soil depth: Beds rarely need more than 4 inches of mixing.
- Accessibility: Cordless models reach tight corners effortlessly.
Greenhouse and Hoop House Cultivation
Enclosed growing spaces restrict equipment size and ventilation requirements. Electric cultivators eliminate fumes that could harm sensitive seedlings. Their quiet operation also allows use during early morning hours without disturbing neighbors.
Orchard and Vineyard Maintenance
Tree and vine rows require careful weed management without damaging shallow roots. Cultivators excel at surface cultivation between rows. This approach reduces competition for water and nutrients while preserving root integrity.
Sloped Terrain and Hillside Gardening
Steep slopes pose safety challenges for heavy tillers that can tip or slide. Lightweight cultivators offer better control on inclines. Always work across the slope rather than up and down to maintain stability.
Compacted Urban Soils and Remediation
Urban gardens often sit on heavily compacted former construction sites. A one-time deep tilling breaks through this hardpan layer. Subsequent seasons only require cultivator passes to maintain loose, healthy soil.
Understanding **what is the difference between a tiller and a cultivator** helps you adapt to any gardening environment. Matching your equipment to specific scenarios ensures optimal results regardless of space constraints.
Conclusion: Understanding the Tiller vs. Cultivator Difference
Knowing **what is the difference between a tiller and a cultivator** transforms your gardening efficiency. Tillers break new ground while cultivators maintain established beds. Choose based on your specific soil conditions and garden size.
Start with a cultivator for small spaces and upgrade to a tiller only when needed. Assess your garden’s current state before investing in either tool.
Ready to improve your soil preparation? Evaluate your garden’s needs today and select the right equipment. Your plants will thank you with healthier growth and higher yields.
Frequently Asked Questions about Tillers and Cultivators
What is the main difference between a tiller and a cultivator?
The primary difference lies in soil depth and intended purpose. Tillers dig 6-10 inches deep to break new ground and prepare seedbeds. Cultivators work the top 2-4 inches for weed control and soil maintenance.
Think of tillers as earth-movers and cultivators as surface groomers. Your choice depends on whether you are starting a new garden or maintaining an existing one.
Can I use a cultivator to break new ground?
Technically yes, but it is highly inefficient and can damage the machine. Cultivators lack the torque and tine strength for compacted or sod-covered soil. Attempting this task strains the engine and produces poor results.
For new plots, rent a tiller for one weekend. Once the ground is broken, switch to a cultivator for all future maintenance work.
Which is better for small gardens: tiller or cultivator?
A cultivator is the better option for gardens under 500 square feet. Its lightweight design maneuvers easily in tight spaces without damaging plant roots. You also save money on purchase price and fuel costs.
Full-size tillers are overkill for small plots and cause soil compaction. Reserve tillers for larger vegetable patches or new bed creation.
How often should I till my garden soil?
Only till when establishing a new bed or incorporating large amounts of organic matter. Over-tilling destroys soil structure and harms beneficial organisms. Most established gardens need tilling only once per season.
For ongoing maintenance, use a cultivator every 2-3 weeks during the growing season. This frequency controls weeds without disrupting soil health.
What is the best way to till compacted clay soil?
Start by moistening the soil lightly and waiting 24 hours. Then use a rear-tine tiller with counter-rotating tines for maximum digging power. Make multiple shallow passes rather than one deep plunge.
Add compost or gypsum after the first pass to improve soil structure. Repeat the process over several weeks for best results.
Are electric cultivators as powerful as gas models?
Electric cultivators deliver sufficient power for most residential tasks but lack the torque of gas engines. They excel in established beds with loose, workable soil. Battery models offer 30-60 minutes of runtime per charge.
For heavy clay or large areas, gas models remain the better choice. Electric units suit small urban gardens and eco-conscious gardeners perfectly.
Why does my tiller pull to one side during operation?
This common issue usually indicates uneven tine wear or a bent tine shaft. Inspect the tines for damage and replace any bent or broken pieces. Also check that both wheels are inflated to equal pressure.
If the problem persists, verify the drive belt tension on both sides. Uneven tension causes the machine to drift during operation.
What safety gear should I wear when using a tiller?
Always wear safety glasses to protect against flying debris and dust. Sturdy steel-toe boots shield your feet from accidental tine contact. Hearing protection is essential for gas-powered models exceeding 90 decibels.
Long pants and gloves protect against scratches and blisters. Never operate equipment barefoot or with loose clothing that could catch in moving parts.